Wednesday, May 30, 2012

"L" is for Letters

Sew: fabric letters


The complete how to make fabric letters for personalizing.


I often get asked how I make the fabric letters I use to personalize items, it's fairly simple and you can use any font that has some 'bulk' to it.

I tend to stick with American Typewriter:


 and Ariel Bold:


Steer clear of skinny fonts with thin lines, they don't work so well when trying to cut from the fabric.

Once you find a font you like adjust the size to fit your piece, I typically start with 150-200 point size.

Here's a few examples using Ariel Bold:


And now some examples in American Typewriter font:


And of course you can do shapes as well:


Here's how to make fabric letters (and shapes):

1. Iron lightweight fusible interfacing onto the wrong side of fabric:
(You can also use double sided fusible (Heat-n-Bond) to iron the letter in place but your sewing machine needle does get gunked up with the adhesive while sewing the zigzag stitch.)


2. Print out your letters and have lightbox ready:


3. Place print out right side down on the lightbox:


4. Place fabric, right side down, on top of print out:


5. Trace just outside letter directly onto interfacing:
(Shut off other light sources to see the print out better, especially when working with dark fabrics.)


6. Carefully cut out the letter, cutting away the traced lines:


7. Line up letter onto item:
I use a clear quilting ruler to see that the letter is centered.


8. Pin letter into place:


9. Zig zag stitch around edge:
Set your stitch length short and medium to narrow for the width to get a snug zigzag:


The possibilities are truly endless!


Thursday, May 24, 2012

"L" is for Lego Tray

Build: portable lego tray


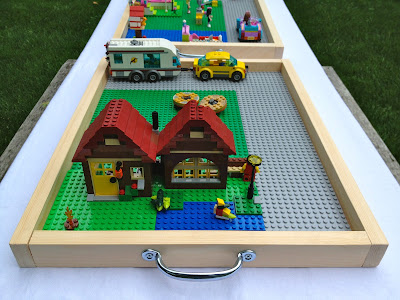
Now your kids can make their Lego builds on a portable tray AND move all the pieces for easy clean up without destroying their hard work!


Legos are the 'in' toy with my kids right now especially with the addition of girl Legos, now all my kids are playing Legos.

One problem - this mess below is what happens every time they build and play Legos:


And forget trying to move all those pieces and parts, it inevitably falls apart.

Now my kids will be building on their Lego trays, making everything portable!


The sides have a low profile for easy access and the tray weighs just over 5 pounds with easy carrying handles:


Each tray measures 20"l x 15 3/4"w:


Here's how I made the portable Lego trays:

1. Obtain one set of lego baseplates:
2 green and 1 blue @ 10"x 10"
1 grey @ 15" x 15"
(I purchased these from Discount School Supply but you can find them here.)


2. Trim blue in half with blade:


3. Trim grey piece:

2 - 4" x 15"
2 - 3.5" x 14"

4. Layout pieces to check for fit:


5. Cut 1/2" plywood board @ 14 1/8" x 18 1/2" (this should match the layout above).

Using 1 - 1x2x8 pine board cut side pieces:
2 @ 20"
2 @ 14 1/8"


6. Assemble.
I used pocket holes underneath but you could screw from the sides as well.
I also added finish nails at the joints.

7. Add handle:


8.  Adhere board pieces to plywood using construction adhesive:
** Check board pieces for fit before applying adhesive, trim edges using scissors to get snug fit.**


Be sure to keep adhesive away from board seams:


Add weight to boards while drying for tight seal:


Ready for Lego building fun!


I'm linking up to:

Whatcha Got Weekend @ Lolly Jane
SAS @ Funky Junk
Sister Sunday @ Sisters of the Wild West
Just Something I Whipped Up @ The Girl Creative
DIY Fall Festival @ The DIY Showoff
Nifty Thrifty @ Coastal Charm
Tuesday Treasures @ My Uncommon Slice of Suburbia
Tutorials & Tips Tuesday @ Home Stories A to Z
Good Life @ A Beach Cottage
Transformation Thursday @ The Shabby Creek Cottage
Strut Your Stuff @ Somewhat Simple
Share Awesomeness Thur @ The 36th Avenue
Flaunt it Friday @ Chic on a Shoestring
Frugal Friday @ The Shabby Nest
SAS @ Just a Girl
Feathered Nest @ French Country Cottage
Remodelaholics Anonymous @ Remodelaholic
inspiration board @ Carolyns Homework

Tuesday, May 22, 2012

"C" is for Clubhouse Bed (the build)

Build: clubhouse fort bed


It fits a regular twin size mattress:


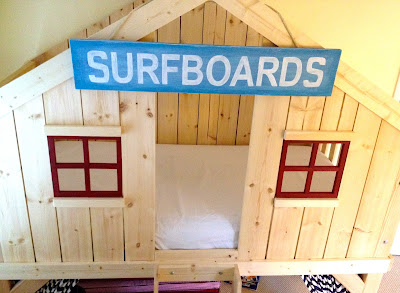
I was so lucky to have the opportunity to build this clubhouse bed, not only was it the most fun but my kids are truly enjoying their new bed:


Including the fun hide out below:


To see how I added the curtains click on my post here.


 Ana had the brilliant idea to add the red window grids:


And I attached them on hinges for more playtime fun:


Here's how I built the bed:

1. Using Ana's plans here cut lumber, side walls first, then back, front and ladder.

2. Assemble the side walls, use a spare 1x3 to get even spaces between the slats:


You'll need lots of pocket hole plugs but only at the visible portion of the top rail:


3. Add the legs, stretchers and finally the front trim piece.
Use the 'portable' pocket hole maker piece to attach the front trim from behind:


4. Assemble the back wall.  Start with the legs and first slat using pocket holes, then find the middle and secure slats from the inside to the trim piece:


Lay out the remaining slats on one side, keeping an even 1/8" space between boards:


5. Once all slats are attached flip over the wall and secure the top trim from the outside, that way your screws and putty will be on the outside - hidden from view.


6. Build the front wall in the same fashion except screw the top trim from the inside this time.
Add a small 1x2 piece at the top seam to keep the trim piece steady, this also provides a good hook for hanging signs across the front.
(or pocket holes if you remember to drill them before assembly!)


I also added a lower interior trim piece to the window sill, securing it to the side slats:


*Sand everything well and seal with clear satin poly.

7. I used 3/8" hex screws at 3 1/2" with washers and nuts in 3 places on each leg to secure both 2x4s together:


Predrill screw holes with 3/8" bit, one at top, middle


and near the bottom:


8. Now add all the mattress slats (1x3 furring strips) working from the edges into the middle.


9. Finally secure the ladder with 3/8" carriage bolts @ 2 3/4" with washers and nuts on the inside:


TO ADD THE HINGED WINDOW GRIDS:

Opening for window: 11 1/2"w x 11 3/4"h
Finished window grid: 11 1/4"w x 11 1/2"h
** Double check your window opening and deduct 1/8" from each side for a hinged grid.

Shopping list: 4 - 3/4" square dowels at 36"

Cut list:

2 @ 11 1/4" (top and bottom)
2 @ 10" (sides)
2 @ 4 5/8" (short cross pieces)
1 @ 9 3/4" (middle cross piece)


2. Attach the sides to the top and bottom using 1 1/2" screws:
(You could definitely use pocket holes too.)


3. Now add one short cross piece to the middle cross piece at center, then add that portion of the grid to the outer frame.


4. Add last short cross grid piece, screw at outer edge and toe nail at center.

Apply hinges.


What a difference the grids make, they really complete the look:


A huge thank you to Ana for suggesting the grids, she always has the smartest ideas and knows exactly how to make a piece sing.


I'm linking up to:

Weekend Wrap Up @ Tatertots and Jello
Whatcha Got Weekend @ Lolly Jane
SAS @ Funky Junk
Sister Sunday @ Sisters of the Wild West
Just Something I Whipped Up @ The Girl Creative
DIY Fall Festival @ The DIY Showoff
Nifty Thrifty @ Coastal Charm
Tuesday Treasures @ My Uncommon Slice of Suburbia
Tutorials & Tips Tuesday @ Home Stories A to Z
Good Life @ A Beach Cottage
Transformation Thursday @ The Shabby Creek Cottage
Strut Your Stuff @ Somewhat Simple
Share Awesomeness Thur @ The 36th Avenue
Flaunt it Friday @ Chic on a Shoestring
Frugal Friday @ The Shabby Nest
SAS @ Just a Girl
Feathered Nest @ French Country Cottage
Remodelaholics Anonymous @ Remodelaholic
inspiration board @ Carolyns Homework
All Things Furniture @ Perfectly Imperfect
Furniture Feature Friday @ Miss Mustard Seed
POWW @ Primitive & Proper