Monday, October 31, 2011

"S" is for Star

Glittered paper star wreath


Made from old paperback book pages, add some glitter and presto:


Looks like a delicate pastry made for the walls.


Here's how I made the paper star:

1. Using a 3D cardboard star shape (thank you Grandma) slice in half:


2. Prepare paper rolls.
Carefully remove old paperback pages.


Tear in half for a more squarish shape.
Roll into cone shape and hot glue.


3. Make lots of paper rolls:


4. Start by gluing rolls onto star points:


Then in the crevices:


5. Fill in all the between sections:


6. Add the next layer leaving top portion of previous layer exposed:


7. This star has 2 layers with an extra layer on top only to emphasize the points:


8. To add the glitter, brush on white glue just on the edges of the roll, doing only a few at a time:


9. Shake glitter onto glue (be sure to do this over scrap paper to collect the excess glitter for re-use).


Hang and enjoy


Previously I shared a rectangular version here:


But the star is definitely better suited for Christmas:


And I just made some mini star ornaments too:


Get the full tutorial on these little ones here.


I'm linking up to:

Whatcha Got Weekend @ Lolly Jane
SAS @ Funky Junk
Weekend Wrap Up @ Tatertots & Jello
Sundae Scoop @ I Heart Naptime
Sister Sunday @ Sisters of the Wild West
Sunday Showcase Party @ Under the Table & Dreaming
Just Something I Whipped Up @ The Girl Creative
DIY Fall Festival @ The DIY Showoff
Made by You Mondays @ Skip to My Lou
Making the World Cuter @ Making the World Cuter
Nifty Thrifty @ Coastal Charm
Tuesday Treasures @ My Uncommon Slice of Suburbia
Tutorials & Tips Tuesday @ Home Stories A to Z
Good Life @ A Beach Cottage
Delightfully Inspiring @ Delightful Order
Transformation Thursday @ The Shabby Creek Cottage
Strut Your Stuff @ Somewhat Simple
Share Awesomeness Thur @ The 36th Avenue
Flaunt it Friday @ Chic on a Shoestring
Tickled Pink @ 504 Main
Frugal Friday @ The Shabby Nest
SAS @ Just a Girl
Feathered Nest @ French Country Cottage
Remodelaholics Anonymous @ Remodelaholic
inspiration board @ Carolyns Homework
Tuesday Timeout @ Reasons to Skip the Housework

Saturday, October 29, 2011

"S" is for Spiders

Kid's craft: styrofoam spiders


This is it, last Halloween post for 2011.

Super easy, fast and fun kids decoration.


Here's how we made the spiders:

1. You will need:

- 3" styrofoam balls
(6 pack is about $4)


Paint black and poke 6 holes around equator with skewer.
Attach ribbon hanger: knot ends together, use straight pin and hot glue down into ball.

- black pipe cleaners, cut in half
- eyeballs, we used felt (googly eyes tend to fall off)
- teeth, we used red felt triangles


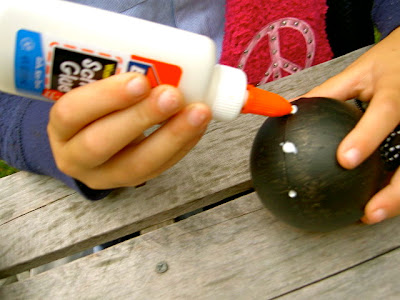
2. Apply glue into holes:


3. Insert pipe cleaner leg into each hole:


4. Apply glue to back of eyeballs:


5. Glue into place:


6. Glue on teeth:


7. Once dry, bend legs at knees and ankles.


Someone got a little zealous with the teeth.

Hang all around for fun.


We did this craft with girl #2's class:


And then I packaged them up to take home:


Using cupcake topper clip art I had from awhile back:
(This clip art is from frogprincepaperie.com)


Cut out with circle cutter, mount to cardstock and add each student's name on back:


Tie on with ribbon:


I also used the favor bag tops from frogprincepaperie.com to wrap up a little teacher gift:


A Halloween key fob.


The kids love giving their teachers gifts so this was the perfect teacher accessory for the holiday.


Despite the snow falling outside we are ready for Halloween, bring on the candy.


I'm linking up to:

Whatcha Got Weekend @ Lolly Jane
SAS @ Funky Junk
Weekend Wrap Up @ Tatertots & Jello
Sundae Scoop @ I Heart Naptime
Sister Sunday @ Sisters of the Wild West
Sunday Showcase Party @ Under the Table & Dreaming
Just Something I Whipped Up @ The Girl Creative
DIY Fall Festival @ The DIY Showoff
Made by You Mondays @ Skip to My Lou
Making the World Cuter @ Making the World Cuter
Nifty Thrifty @ Coastal Charm
Tuesday Treasures @ My Uncommon Slice of Suburbia
Tutorials & Tips Tuesday @ Home Stories A to Z
Good Life @ A Beach Cottage
Delightfully Inspiring @ Delightful Order
Transformation Thursday @ The Shabby Creek Cottage
Strut Your Stuff @ Somewhat Simple
Share Awesomeness Thur @ The 36th Avenue
Flaunt it Friday @ Chic on a Shoestring
Tickled Pink @ 504 Main
Frugal Friday @ The Shabby Nest
SAS @ Just a Girl
Feathered Nest @ French Country Cottage
Remodelaholics Anonymous @ Remodelaholic
inspiration board @ Carolyns Homework
Tuesday Timeout @ Reasons to Skip the Housework

Thursday, October 27, 2011

"T" is for Type

Type tray turned Advent calendar.


Although the countdown has not begun yet (we still have 58 days!) we are ready.


I found this simple type tray at United House Wrecking in Stamford, CT.
They have all kinds of unusual items for the home; furniture, decor, memorabilia.


Clearly it used to hold letters for some sort of printmaker.

But it was a bit boring.  And I figured out the 48 spots would make a perfect Advent calendar.


Any candy will do but the kisses fit so perfectly.


I can't take all the credit for the kisses idea, Beckie over at Infarrantly Creative makes countdown kisses calendars for nearly every holiday:


image from Infarrantly Creative

Click here to see Beckie's how to countdown calendar.

The kisses sit perfectly on each little shelf ready to be eaten:


Here's how I made the calendar:

1. Sand off visible writing.  Cover outer edge with painters tape.

2. Paint four sides inside each box and background of every other box:


3. Remove painters tape, sand top surface edges of all box dividers to remove messy paint:


3. Cut scrapbook paper pieces to fit boxes:


4. Apply mod podge to background of box, place scrapbook paper into box, cover with mod podge.


5. Using vinyl rub on numbers line up and rub into place in red background boxes.


6. Fill with kisses.


My kids already ate this batch of kisses so we'll be getting fresh ones before Dec. 1.


A very easy transformation into something fun and functional.


One last side by side:


Ready for the countdown to begin.


I'm linking up to:


Whatcha Got Weekend @ Lolly Jane
SAS @ Funky Junk
Weekend Wrap Up @ Tatertots & Jello
Sundae Scoop @ I Heart Naptime
Sister Sunday @ Sisters of the Wild West
Sunday Showcase Party @ Under the Table & Dreaming
Just Something I Whipped Up @ The Girl Creative
DIY Fall Festival @ The DIY Showoff
Made by You Mondays @ Skip to My Lou
Making the World Cuter @ Making the World Cuter
Nifty Thrifty @ Coastal Charm
Tuesday Treasures @ My Uncommon Slice of Suburbia
Tutorials & Tips Tuesday @ Home Stories A to Z
Good Life @ A Beach Cottage
Delightfully Inspiring @ Delightful Order
Transformation Thursday @ The Shabby Creek Cottage
Strut Your Stuff @ Somewhat Simple
Share Awesomeness Thur @ The 36th Avenue
Flaunt it Friday @ Chic on a Shoestring
Tickled Pink @ 504 Main
Frugal Friday @ The Shabby Nest
SAS @ Just a Girl
Feathered Nest @ French Country Cottage
Remodelaholics Anonymous @ Remodelaholic
inspiration board @ Carolyns Homework
Tuesday Timeout @ Reasons to Skip the Housework
Before & After @ Thrifty Decor Chic
Weekly Challenge @ The CSI Project
The DIY Show Off