Wednesday, February 29, 2012

"T" is for Turf Wreath

Spring wreath covered with turf:


Artificial turf wrapped around a foam wreath form:


Add some fake flowers and oilcloth ribbon hanger:


It's fake all the way through but I have yet to see a turf wreath so I just had to do it.

Last spring I made a turf mantle cover:


and a turf table runner:


So I had to continue the turf tradition with something new for 2012,

the turf wreath:


Here's how I made the turf wreath:

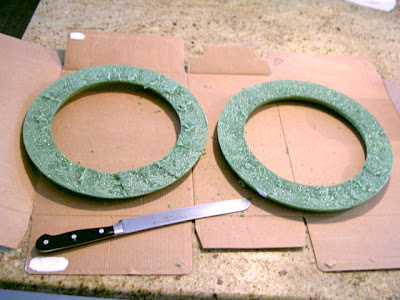
1. Using a 12" styrofoam wreath form, saw in half with serrated knife:


Now you can make 2 wreaths for the price of 1!
And your wreath will lie flat against the door.


2. Cut out a circle of artificial turf big enough to wrap around the edges:


3. Hot glue the turf to the front and outer edges of the form wrapping around to the back.
For the inner circle be sure to clip the turf so it lies flat and doesn't buckle:


4. Organize your fake flowers in bunches:


5. Secure flowers using floral wire and hot glue:


6. Add ribbon to center:


7. For oilcloth hanger cut long strip and top stitch edges:


8. Wrap one long piece around wreath.
Make 'bow' by forming 2 loops and hot glue in center.
Make center of bow by folding oilcloth in half:


Then wrap skinny center piece around middle of bow, pinching bow, hot glue to hold: 


9. Hot glue bow into place at top of hanging piece:


Ready for Spring (and St. Patrick's Day too!):


Here you can see how it rests flatter against the door, less bulk for folks to bang into when they come through the door:


Love the fun, playful feeling of turf, makes me wish Spring was here already.


I'm linking up to:

Whatcha Got Weekend @ Lolly Jane
SAS @ Funky Junk
Sister Sunday @ Sisters of the Wild West
Just Something I Whipped Up @ The Girl Creative
DIY Fall Festival @ The DIY Showoff
Nifty Thrifty @ Coastal Charm
Tuesday Treasures @ My Uncommon Slice of Suburbia
Tutorials & Tips Tuesday @ Home Stories A to Z
Good Life @ A Beach Cottage
Transformation Thursday @ The Shabby Creek Cottage
Strut Your Stuff @ Somewhat Simple
Share Awesomeness Thur @ The 36th Avenue
Flaunt it Friday @ Chic on a Shoestring
Frugal Friday @ The Shabby Nest
SAS @ Just a Girl
Feathered Nest @ French Country Cottage
Remodelaholics Anonymous @ Remodelaholic
inspiration board @ Carolyns Homework
Spring Fling @ Southern Hospitality

Monday, February 27, 2012

"T" is for Trugs

Built: more personalized striped trugs with handpainted names


I can never make just one of something, it has to be in multiples.

These 2 are for my girls for Easter:


But Jack is a special request from a friend.

She loves a good nautical bit and Jack went right along with the All American red, white and blue theme:


All on the heels of last weeks orange trug for Derek:


Here's how I made the trugs:

1. Cut pieces from 3/8" plywood:
(For more detailed construction how-to check my previous post here.)


2. Construct, sand, prime and paint.
Use painters tape to create stripe space:


3. Paint 2 coats of stripe color:


4. Remove painters tape:


5. Print out letters.
I used American Typewriter font size 200.
Line up printout then trace letters with ballpoint pen which leaves an indent in the wood.
Paint on and inside the indent.


6. Seal with spray clear poly:


Ready to fill with toys.


I'm linking up to:

Whatcha Got Weekend @ Lolly Jane
SAS @ Funky Junk
Sister Sunday @ Sisters of the Wild West
Just Something I Whipped Up @ The Girl Creative
DIY Fall Festival @ The DIY Showoff
Nifty Thrifty @ Coastal Charm
Tuesday Treasures @ My Uncommon Slice of Suburbia
Tutorials & Tips Tuesday @ Home Stories A to Z
Good Life @ A Beach Cottage
Transformation Thursday @ The Shabby Creek Cottage
Strut Your Stuff @ Somewhat Simple
Share Awesomeness Thur @ The 36th Avenue
Flaunt it Friday @ Chic on a Shoestring
Frugal Friday @ The Shabby Nest
SAS @ Just a Girl
Feathered Nest @ French Country Cottage
Remodelaholics Anonymous @ Remodelaholic
inspiration board @ Carolyns Homework

Saturday, February 25, 2012

"L" is for Lakes

Paint: Land of 10,000 Lakes sign

(aka Minnesota)


Minnesota holds a special place in my heart, I was born and raised there.


I spent some time on these lakes:

Moore Lake in Fridley, MN
Coal Lake in Browerville, MN
Pleasant Lake in North Oaks, MN
Gull Lake in Nisswa, MN

and there are many others like White Bear Lake and Lake Owen (although technically in Wisconsin).


Inspired by Nicole Meyer's Branding 10,000 Lakes project where she creates a logo for a Minnesota lake, one lake, one logo, every day.

Below is what she created for Coal Lake and Gull Lake:


And then I added the outline of the state, inspired by these state themed postcards:


And placed my sign prominently above our bed, my husband hails from New York City so this Midwestern girl deserves a little reminder of the good old days:


Here's how I made the sign:

1. Using a piece of 3/4" pine, paint two coats Behr swiss coffee:


2. Print out lettering to fit sign.
Layout and trace letters with ballpoint pen which leaves an indent in the wood:


3. Paint inside the indent:


4. Layer the colors and add state outline:


5. Ready for distressing, stain and clear poly.


Thanks Minnesota for many years of great memories.


I'm linking up to:

Whatcha Got Weekend @ Lolly Jane
SAS @ Funky Junk
Sister Sunday @ Sisters of the Wild West
Just Something I Whipped Up @ The Girl Creative
DIY Project Parade @ The DIY Showoff
Nifty Thrifty @ Coastal Charm
Tuesday Treasures @ My Uncommon Slice of Suburbia
Tutorials & Tips Tuesday @ Home Stories A to Z
Good Life @ A Beach Cottage
Transformation Thursday @ The Shabby Creek Cottage
Strut Your Stuff @ Somewhat Simple
Share Awesomeness Thur @ The 36th Avenue
Flaunt it Friday @ Chic on a Shoestring
Frugal Friday @ The Shabby Nest
SAS @ Just a Girl
Feathered Nest @ French Country Cottage
Remodelaholics Anonymous @ Remodelaholic
inspiration board @ Carolyns Homework